
Recap of the previous chapter: State recording
- You learned how to record and restore operations through State.
- You became comfortable using the State-related methods and events.
In this chapter you will learn
- How the Five SDK event system works.
- How to obtain the 3D position of a point.
Preparation
Let's create a new directory (src/4.points-in-3d) together with the corresponding html file and jsx or tsx file. Carrying over the State code from the previous chapter would be too cumbersome, so we'll build on top of the content from the Displaying 3D Space chapter instead.
<!DOCTYPE html>
<html lang="en">
<head>
  <meta charset="UTF-8">
  <link rel="icon" href="data:;base64,iVBORw0KGgo=">
  <meta name="viewport" content="width=device-width, initial-scale=1.0">
  <title>Points in 3D | Points in 3d</title>
  <style>
    * { margin: 0; padding: 0; }
    html, body #app { width: 100%; height: 100%; overflow: hidden; }
  </style>
</head>
<body>
  <div id="app"></div>
  <script type="module" src="./index"></script>
</body>
</html>import React, { Component } from "react";
import { parseWork } from "@realsee/five";
/**
* React HOC that fetches the work
* @param url the URL of work.json
*/
function withFetchWork(url) {
return function(Compnent) {
return class extends Component {
state = { work: null };
componentDidMount() {
fetch(url).then(res => res.json()).then(json => {
this.setState({ work: parseWork(json) });
});
}
render() {
if (this.state.work === null) return null;
return <Compnent work={this.state.work} {...this.props}/>;
}
}
}
}
export { withFetchWork };import React, { Component } from "react";
/**
* React HOC: get the dimensions of the current window
*/
function withWindowDimensions() {
return function(Compnent) {
return class extends Component {
state = this.getWindowDimensions();
resizeListener = () => {
this.setState(this.getWindowDimensions());
};
getWindowDimensions() {
return { width: window.innerWidth, height: window.innerHeight };
}
componentDidMount() {
window.addEventListener("resize", this.resizeListener, false);
}
componentWillUnmount() {
window.removeEventListener("resize", this.resizeListener, false);
}
render() {
const dimensions = { width: this.state.width, height: this.state.height };
return <Compnent windowDimensions={dimensions} {...this.props}/>;
}
}
}
}
export { withWindowDimensions };import React, { Component } from "react";
import { Five } from "@realsee/five";
import { withFive, createFiveFeature } from "@realsee/five/react";
import { compose } from "@wordpress/compose";
import BottomNavigation from "@mui/material/BottomNavigation";
import BottomNavigationAction from "@mui/material/BottomNavigationAction";
import Paper from "@mui/material/Paper";
import DirectionsWalkIcon from "@mui/icons-material/DirectionsWalk";
import ViewInArIcon from "@mui/icons-material/ViewInAr";
const FEATURES = createFiveFeature("currentState", "setState");
/**
* React Component: mode control
*/
const ModeController = compose(
withFive(FEATURES)
)(class extends Component {
render() {
return <Paper sx={{ position: "fixed", bottom: 0, left: 0, right: 0 }}>
<BottomNavigation
showLabels
value={this.props.$five.currentState.mode}
onChange={(_, newValue) => {
this.props.$five.setState({ mode: newValue });
}}
>
<BottomNavigationAction label="Panorama Walkthrough" icon={<DirectionsWalkIcon/>} value={Five.Mode.Panorama}/>
<BottomNavigationAction label="Space Overview" icon={<ViewInArIcon/>} value={Five.Mode.Floorplan}/>
</BottomNavigation>
</Paper>;
}
})
export { ModeController };import React, { Component } from "react";
import { compose } from "@wordpress/compose";
import { createFiveProvider, FiveCanvas } from "@realsee/five/react";
import { withFetchWork } from "./withFetchWork";
import { withWindowDimensions } from "./withWindowDimensions";
import { ModeController } from "./ModeController";
/** Data URL of work.json */
const workURL = "https://vr-public.realsee-cdn.cn/release/static/image/release/five/work-sample/07bdc58f413bc5494f05c7cbb5cbdce4/work.json";
const FiveProvider = createFiveProvider();
const App = compose(
withFetchWork(workURL),
withWindowDimensions()
)(class extends Component {
render() {
const { work, windowDimensions } = this.props;
return <FiveProvider initialWork={work}>
<FiveCanvas width={windowDimensions.width} height={windowDimensions.height}/>
<ModeController/>;
</FiveProvider>;
}
});
export { App };import React from "react";
import ReactDOM from "react-dom";
import { App } from "./App";
ReactDOM.render(<App/>, document.querySelector("#app"));
export {};import React, { Component, ComponentClass } from "react";
import { Work, parseWork } from "@realsee/five";
/**
* React HOC that fetches the work
* @param url the URL of work.json
*/
function withFetchWork<P extends Record<string, any>>(url: string) {
return function(Compnent: ComponentClass<P & { work: Work }>): ComponentClass<P> {
return class extends Component<P, {work: Work | null}> {
state = { work: null };
componentDidMount() {
fetch(url).then(res => res.json()).then(json => {
this.setState({ work: parseWork(json) });
});
}
render() {
if (this.state.work === null) return null;
return <Compnent work={this.state.work} {...this.props}/>;
}
}
}
}
export { withFetchWork };import React, { Component, ComponentClass } from "react";
/**
* React HOC: get the dimensions of the current window
*/
function withWindowDimensions<P extends Record<string, any>>() {
return function(Compnent: ComponentClass<P & { windowDimensions: { width: number, height: number} }>): ComponentClass<P> {
return class extends Component<P, {width: number, height: number}> {
state = this.getWindowDimensions();
resizeListener = () => {
this.setState(this.getWindowDimensions());
};
getWindowDimensions() {
return { width: window.innerWidth, height: window.innerHeight };
}
componentDidMount() {
window.addEventListener("resize", this.resizeListener, false);
}
componentWillUnmount() {
window.removeEventListener("resize", this.resizeListener, false);
}
render() {
const dimensions = { width: this.state.width, height: this.state.height };
return <Compnent windowDimensions={dimensions} {...this.props}/>;
}
}
}
}
export { withWindowDimensions };import React, { Component } from "react";
import { Five, Mode } from "@realsee/five";
import { withFive, createFiveFeature, PropTypeOfFiveFeatures } from "@realsee/five/react";
import { compose } from "@wordpress/compose";
import BottomNavigation from "@mui/material/BottomNavigation";
import BottomNavigationAction from "@mui/material/BottomNavigationAction";
import Paper from "@mui/material/Paper";
import DirectionsWalkIcon from "@mui/icons-material/DirectionsWalk";
import ViewInArIcon from "@mui/icons-material/ViewInAr";
const FEATURES = createFiveFeature("currentState", "setState");
type Props = PropTypeOfFiveFeatures<typeof FEATURES>;
/**
* React Component: mode control
*/
const ModeController = compose(
withFive(FEATURES)
)(class extends Component<Props> {
render() {
return <Paper sx={{ position: "fixed", bottom: 0, left: 0, right: 0 }}>
<BottomNavigation
showLabels
value={this.props.$five.currentState.mode}
onChange={(_, newValue: Mode) => {
this.props.$five.setState({ mode: newValue });
}}
>
<BottomNavigationAction label="Panorama Walkthrough" icon={<DirectionsWalkIcon/>} value={Five.Mode.Panorama}/>
<BottomNavigationAction label="Space Overview" icon={<ViewInArIcon/>} value={Five.Mode.Floorplan}/>
</BottomNavigation>
</Paper>;
}
})
export { ModeController };import React, { Component } from "react";
import { Work } from "@realsee/five";
import { createFiveProvider, FiveCanvas } from "@realsee/five/react";
import { compose } from "@wordpress/compose";
import { withFetchWork } from "./withFetchWork";
import { withWindowDimensions } from "./withWindowDimensions";
import { ModeController } from "./ModeController";
/** Data URL of work.json */
const workURL = "https://vr-public.realsee-cdn.cn/release/static/image/release/five/work-sample/07bdc58f413bc5494f05c7cbb5cbdce4/work.json";
const FiveProvider = createFiveProvider();
const App = compose(
withFetchWork(workURL),
withWindowDimensions()
)(class extends Component<{work: Work, windowDimensions: { width: number, height: number }}> {
render() {
const { work, windowDimensions } = this.props;
return <FiveProvider initialWork={work}>
<FiveCanvas width={windowDimensions.width} height={windowDimensions.height}/>
<ModeController/>
</FiveProvider>;
}
});
export { App };import React from "react";
import ReactDOM from "react-dom";
import { App } from "./App";
ReactDOM.render(<App/>, document.querySelector("#app"));
export {};Start the dev server with npm run dev, then navigate to the current page at "http://localhost:3000/src/4.points-in-3d/index.html".
Info
Check your console: the port number may change depending on your configuration and which ports are currently in use, so rely on the console output. If you use a different build tool, start the server according to that build tool's requirements.
The Event System
When you click on the screen, the default behavior of the Five SDK is to select the most suitable observer near the clicked position and move there. This is what most users want, much like how a browser handles an anchor (<a>) tag by navigating to its link in most cases. The behavior above is the Five SDK's built-in tapGesture event.
Built-in events
The Five SDK ships with the following built-in events:
- tapGesture: a left mouse-button click or a finger tap. Default behavior: move to an observer.
- panGesture: holding down the mouse button and dragging, or dragging a finger across the screen. The camera rotates (in Topview it pans).
- pinchGesture: a two-finger pinch gesture. Default behavior: change the camera's field of view.
- mouseWheel: the mouse wheel. Default behavior: change the camera's field of view.
- gesture: any of the events above.
Preventing default behavior
Just like a browser's handling of an anchor (<a>) tag, every event lets you prevent its default behavior. You only need to listen for the events whose names start with wants and return false from the callback. For example, to prevent the default observer-movement behavior of tapGesture, you can do the following.
this.props.$five.on("wantsTapGesture", () => {
  // highlight-start
  // Prevent tapGesture from firing
  return false;
  // highlight-end
});
For the detailed API of each event, see the full documentation:
Getting Coordinates from tapGesture
We'll build a simple feature that marks the 3D position you click on the canvas.
To avoid conflicting with the observer movement feature, we'll use a
Switchbutton to control whether marking mode is on.
Adding dependencies at the top
This chapter calls for a brief introduction to three.js. three.js is a 3D graphics library, and the Five SDK uses three.js's math library and renderer. Two pieces of three.js come into play in this chapter; we'll explain them here. You don't need to fully understand three.js — a few notes are enough.
- `THREE.Vector3`: you can simply think of it as a
{ x: number, y: number, z: number }struct, with some extra math methods added (we won't use the math methods this time, we only record xyz). - `THREE.Raycaster`: the ray-casting class. You can simply understand it as: a point on the screen corresponds to a ray in 3D space.
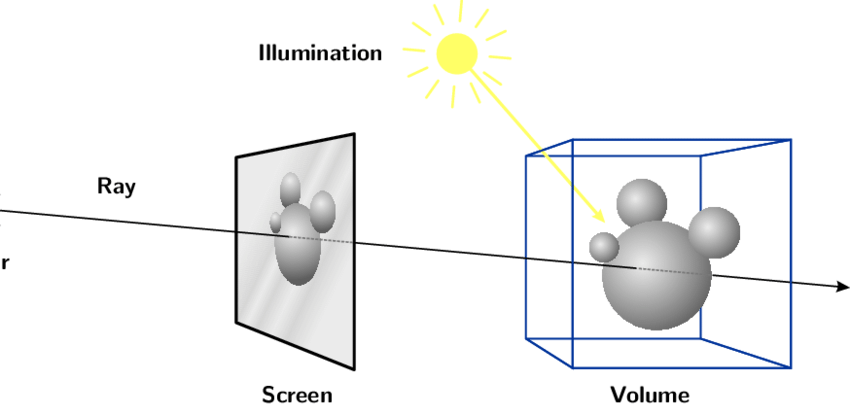
Rays have many uses. For example, by testing whether a ray intersects a model, you can determine whether an object is selected.
Writing the MarkController component
- Add a MarkController file to write the component in.
- We use the active React state to control whether the application is currently in marking mode.
- The first argument of
tapGestureis araycaster; passing it tointersectRaycastergives you the intersection informationintersect, andintersect.pointis the coordinate of the intersection point. - We use the marks React state to store all intersection points, and implement collecting and deleting them.
import React, { Component } from "react";
import { compose } from "@wordpress/compose";
import { withFive, createFiveFeature } from "@realsee/five/react";
import Button from "@mui/material/Button";
import Switch from "@mui/material/Switch";
import Chip from "@mui/material/Chip";
import Stack from "@mui/material/Stack";
import Paper from "@mui/material/Paper";

const FEATURES = createFiveFeature("intersectRaycaster", "on", "off");

const MarkController = compose(
  withFive(FEATURES)
)(class extends Component {

  state = { active: false, marks: [] };

  onTapGesture = (raycaster) => {
    if (this.state.active) {
      const [intersect] = this.props.$five.intersectRaycaster(raycaster);
      if (intersect) this.setState({ marks: this.state.marks.concat(intersect.point) });
      return false;
    }
  };

  componentDidMount() {
    this.props.$five.on("wantsTapGesture", this.onTapGesture);
  }
  componentWillUnmount() {
    this.props.$five.off("wantsTapGesture", this.onTapGesture);
  }
  render() {
    return <Paper sx={{ position: "fixed", top: 10, left: 10, padding: 1 }}>
      <Stack>
        <Stack direction="row">
          <Switch
            checked={this.state.active}
            onChange={(event, checked) => this.setState({ active: checked })}
          /> <Button disabled>Enable click-to-record coordinates</Button>
        </Stack>
        <Stack spacing={1}>
        {this.state.marks.map((point, index) => {
          const { x, y, z } = point;
          return <Chip
            key={index}
            label={`x=${x.toFixed(2)} y=${y.toFixed(2)} z=${z.toFixed(2)}`}
            onDelete={() => this.setState({marks: this.state.marks.filter((_, index_) => index_ !== index)})}
          />
        })}
        </Stack>
      </Stack>
    </Paper>
  }
});

export { MarkController };import * as THREE from "three";
import React, { Component } from "react";
import { compose } from "@wordpress/compose";
import { EventCallback } from "@realsee/five";
import { withFive, createFiveFeature, PropTypeOfFiveFeatures } from "@realsee/five/react";
import Button from "@mui/material/Button";
import Switch from "@mui/material/Switch";
import Chip from "@mui/material/Chip";
import Stack from "@mui/material/Stack";
import Paper from "@mui/material/Paper";
const FEATURES = createFiveFeature("intersectRaycaster", "on", "off");
type Props = PropTypeOfFiveFeatures<typeof FEATURES>;
type State = {
active: boolean,
marks: THREE.Vector3[],
};
const MarkController = compose(
withFive(FEATURES)
)(class extends Component<Props, State> {
state: State = { active: false, marks: [] };
onTapGesture: EventCallback["wantsTapGesture"] = (raycaster) => {
if (this.state.active) {
const [intersect] = this.props.$five.intersectRaycaster(raycaster);
if (intersect) this.setState({ marks: this.state.marks.concat(intersect.point) });
return false;
}
};
componentDidMount() {
this.props.$five.on("wantsTapGesture", this.onTapGesture);
}
componentWillUnmount() {
this.props.$five.off("wantsTapGesture", this.onTapGesture);
}
render() {
return <Paper sx={{ position: "fixed", top: 10, left: 10, padding: 1 }}>
<Stack>
<Stack direction="row">
<Switch
checked={this.state.active}
onChange={(event, checked) => this.setState({ active: checked })}
/> <Button disabled>Enable click-to-record coordinates</Button>
</Stack>
<Stack spacing={1}>
{this.state.marks.map((point, index) => {
const { x, y, z } = point;
return <Chip
key={index}
label={`x=${x.toFixed(2)} y=${y.toFixed(2)} z=${z.toFixed(2)}`}
onDelete={() => this.setState({marks: this.state.marks.filter((_, index_) => index_ !== index)})}
/>
})}
</Stack>
</Stack>
</Paper>
}
});
export { MarkController };Using the marking component
Insert it into the FiveProvider in the App file.
import React, { Component } from "react";
import { compose } from "@wordpress/compose";
import { createFiveProvider, FiveCanvas } from "@realsee/five/react";
import { withFetchWork } from "./withFetchWork";
import { withWindowDimensions } from "./withWindowDimensions";
import { ModeController } from "./ModeController";
// highlight-start
import { MarkController } from "./MarkController";
// highlight-end

/** Data URL of work.json */
const workURL = "https://vr-public.realsee-cdn.cn/release/static/image/release/five/work-sample/07bdc58f413bc5494f05c7cbb5cbdce4/work.json";

const FiveProvider = createFiveProvider();

const App = compose(
  withFetchWork(workURL),
  withWindowDimensions()
)(class extends Component {
  render() {
    const { work, windowDimensions } = this.props;
    return <FiveProvider initialWork={work}>
      <FiveCanvas width={windowDimensions.width} height={windowDimensions.height}/>
      <ModeController/>;
      // highlight-start
      <MarkController/>;
      // highlight-end
    </FiveProvider>;
  }
});

export { App };import React, { Component } from "react";
import { Work } from "@realsee/five";
import { createFiveProvider, FiveCanvas } from "@realsee/five/react";
import { compose } from "@wordpress/compose";
import { withFetchWork } from "./withFetchWork";
import { withWindowDimensions } from "./withWindowDimensions";
import { ModeController } from "./ModeController";
// highlight-start
import { MarkController } from "./MarkController";
// highlight-end
/** Data URL of work.json */
const workURL = "https://vr-public.realsee-cdn.cn/release/static/image/release/five/work-sample/07bdc58f413bc5494f05c7cbb5cbdce4/work.json";
const FiveProvider = createFiveProvider();
const App = compose(
withFetchWork(workURL),
withWindowDimensions()
)(class extends Component<{work: Work, windowDimensions: { width: number, height: number }}> {
render() {
const { work, windowDimensions } = this.props;
return <FiveProvider initialWork={work}>
<FiveCanvas width={windowDimensions.width} height={windowDimensions.height}/>
<ModeController/>
// highlight-start
<MarkController/>
// highlight-end
</FiveProvider>;
}
});
export { App };Go back to your browser. You'll see a toggle switch appear in the top-left corner of the page. Turn it on, click somewhere in the canvas, and the coordinate of the clicked position will be printed.
Nicely done — you've understood and obtained 3D coordinates in no time 🥳.
What You'll Learn in the Next Chapter
Tip
In the next chapter we'll implement a spatial tag feature. Don't miss it.